Showing posts with label How-to's. Show all posts

Monday, December 2, 2013

How to build an inexpensive stir plate

Pitching the right amount of yeast is undoubtably one of the more important aspects of brewing good beer, and the most effective way to make a healthy yeast starter is by using a stir plate. You can easily buy a stir plate, but the cheapest units that I've ever seen run about $45. Although $45 is not an enormous amount of money, you can easily build your own for as little as $10 (if not cheaper), and it is a really fun DIY project! Here I'll show you how I built mine so you can build one too!

Let's start with the parts you'll need:

  • A wooden cigar box (you can usually get them for very cheap, if not for free, from you local cigar store)
  • 12v DC computer fan (I used an 90mm one, but use one that fits nicely in your cigar box)
  • Variable computer fan speed controller or potentiometer (I got one this one)
  • Bottle cap
  • 12 AC adapter (I had one lying around from an old router)
  • A neodymium magnet from an old hard drive, also called a "rare earth magnet." If you don't have an old hard drive laying around, ask friends, check with computer recycling centers, and call your local dump to find one.
  • Electrical tape
  • Strong glue or epoxy (I used "Amazing Goop" household glue)
  • A non-magnetic spacer that fits in a bottle cap (I used felt pads that go underneath furniture, but you can use anything really; get creative!)
  • Four #6-32 x 2” machine screws
  • Twelve #6-32 machine screw nuts
  • Twelve #6 metal washers
  • Four 1⁄4” flat neoprene washers
  • A drill

*In order to make a yeast starter, you will need a 2L Erlenmeyer Flask (I purchased this one from my local brew store) and a magnetic stir bar (I got mine from here). I do not cover using these items or how to make a yeast starter in this post, but you can easily find out how in the forums of homebrewtalk.com and at yeastcalc.com.

Alright, now let's start building our stir plate!

1) First, start by removing the magnet from the hard drive. Use this helpful blog tutorial to learn how to do this. Please be careful when handling neodymium magnets, as they are incredibly strong and you can easily pinch a finger between the magnet and a metal surface. After you've fully removed the magnet from its bracket, you'll have a magnet that looks like this:


2) Next, you will want to get your fan ready. First, cut off the connector end of the fan, right at the base of the connector, so you are left with the long black and red wires coming from the fan. If your fan has a yellow wire on it as well, you can cut it off completely. After that, glue your spacer on top of the fan blade. The point of the spacer is to provide distance between the brushless motor inside the fan and the magnet that you will later affix onto it. If you simply place the magnet directly onto the fan without a spacer, the magnet will prevent the fan motor from operating properly.


3) Once your spacer is glued onto the fan, go ahead and glue the bottle cap onto the spacer. Next, position the magnet onto the bottle cap, but do not glue it down yet. Take your AC adaptor, cut off the end of the adapter, and then carefully separate the two wires. You will notice that one of the wires is marked, usually with a white or grey lines - this is the active wire. The other wire is the passive wire. Splice the active wire to the red wire on the fan, and the passive wire to the black wire on the fan. Plug in the AC adaptor to an outlet to ensure that it operates. Now for the tricky part: finding best position for the magnet. Try to get the magnet centered onto the bottle cap as best as you can, then plug in the AC adaptor. You will see how centered your magnet is based on how much the fan wobbles. Keep moving the magnet around on the bottle cap until your fan can spin with as little wobble as possible (a little bit of wobble is okay, but if you have too much, your stir plate will dance across the floor). Then use a permanent marker and trace the outline of the magnet onto the bottle cap and then glue the magnet down. Separate the AC adapter from the fan, and allow ample time for the glue to set.


4) Now we will affix the fan to the inside of the cigar box. Start by centering the fan on top of the cigar box and marking where each mounting hole is; use these to guide where you will drill. Drill your four holes for your #6-32 machine screws into the lid. Once you drill your holes, use the phillips head bit on your drill to create an indentation (also called countersinking) so your screws can lay flush with the top of the box. See the two pictures below for an example.

Countersinking
Screws are flush with the lid

5) Put the neoprene washers flush on the inside of the lid, followed by a metal washer, and then a nut. The result should look like this:


6) Add a nut followed by a washer on each screw, then place the fan on the screws with the magnet pointing towards the inside of the lid. Adjust the spacing of the magnet from the lid using the screws in order to ensure that there is about 3/16" space between the magnet and the inside of the cigar box lid. Once you've done this, add a washer and nut to the end of each screw to secure the fan in place. The result will look something like this:


7) Drill a small hole on one of the sides of the box and feed the cable of the AC adapter through the hole:


8) Separate the potentiometer from the metal plating on the fan speed controller. You will be left with a little knob and some wires. Cut off the connector ends from the fan speed controller (if there is a yellow cable, cut it off completely), and then splice it between the fan and the AC adaptor. The potentiometer will regulate the voltage traveling between the AC adapter and the fan. Make sure that all cables are connected properly, and then wrap the exposed wires in plenty of electrical tape.


9) Drill a hole in the side of your cigar box that is large enough to fit the potentiometer knob through, then glue it in place; allow adequate time for the glue to dry. Use more electrical tape to band the wire bundles together to make everything look nice and neat:


10) Plug in the AC adapter and ensure that everything works properly. The potentiometer should control the fan speed and the box shouldn't wobble while it is on. If you'd like, you can drill a series of small holes along the bottom sides of the box to allow for airflow. If all is as it should be, then revel in your craftsmanship and make a kick-ass yeast starter!


Monday, April 15, 2013

How to conduct an all-grain brew (video)

I've recorded my first how-to video! Here I demonstrate how to conduct the mash, sparge, and boil for an all-grain brew. The recipe I am brewing in this video is "Yo' Mama's Magic Mild," and you can find the recipe here. Infinite thanks to my friend Jeremy for recording and editing this video. Expect more how-to videos in the not-so-distant future, so keep checking back!


You can purchase a mash tun and HLT kit much like the one I'm using from the guys at HomeBrewStuff.com!

Friday, November 9, 2012

How I built my kegerator out of a 25 cu. ft. upright freezer (aka keezer)

I have wanted a kegerator for years, long before I began brewing beer. After I had gotten a solid feel for brewing, I decided it was time to get a force-carbonation setup and build a kegerator. At first, I began looking for mini-fridges, but I really wanted to build a setup that could take 4 Cornelius kegs (5-gallon) and a CO2 tank. I could not find a decently priced, used mini-fridge that could fit all of it. I happened across a 25 cu. ft. commercial freezer on Craigslist for a great price, so I bought it. With this size, I will be able to fit up to 7 kegs and a 10 lb. CO2 tank. The initial setup is quite costly, so I only installed one tap to start, but I have a 4-way gas manifold which allowed me to expand to 4 taps over time.


First, I cut out the three bottom shelves in the door to allow more room for the kegs. I used a cordless electric handsaw to cut out the shelves, and then I used some plant-based spray-on foam insulation (picked up at my local hardware store) to fill the gaping holes that remained. After that, I cut off the excess foam insulation and then sanded it down.


I retained the top few shelves for storing glasses. I went to Goodwill and picked up both pint and liter glasses. It's good to have options!


I bought a Perlick 525 Stainless Steel faucet, which I am super satisfied with. These faucets are forward-sealing, so they are easier to clean and less likely to harbor bacteria. I purchased these shanks from MoreBeer.com, and they were the perfect size for the freezer door.


Installing the faucet was rather easy: I simply used a 1" hole saw to bore a hole through the freezer door, then I slid the shank in and tightened it down and installed the tap.


I bought an Eva-Dry e500 dehumidifier for the freezer, which has proven to be a great investment. I'd highly recommend getting one, should you decide to build a kegerator. It has a 10 year life span and you can recharge it by simply plugging it into a wall outlet for an hour. You can see it positioned behind my 4-way CO2 manifold in the picture to the right.


To keep the freezer's temperature sitting at 40*F (which I have found to be the sweet spot for kegged beer), I installed a Johnson Controls analog temperature controller. This controller is great because it is accurate and it does not require any electrical rewiring.


Here you can see the whole setup. I've got the CO2 tank connected to a dual-gauge CO2 regulator, which feeds into the 4-way gas manifold, which then charges the kegs. The keg on the right is connected to the faucet, and you can see how I have all of the beer line coiled around the top of the keg. Even after "balancing" my system, I was initially having foaming problems. After asking around on some forums, I was advised to use 10 feet of beer line instead of the 5 feet I was using. I simply coil all of the slack around the top of the keg, and now I have no more foaming problems!


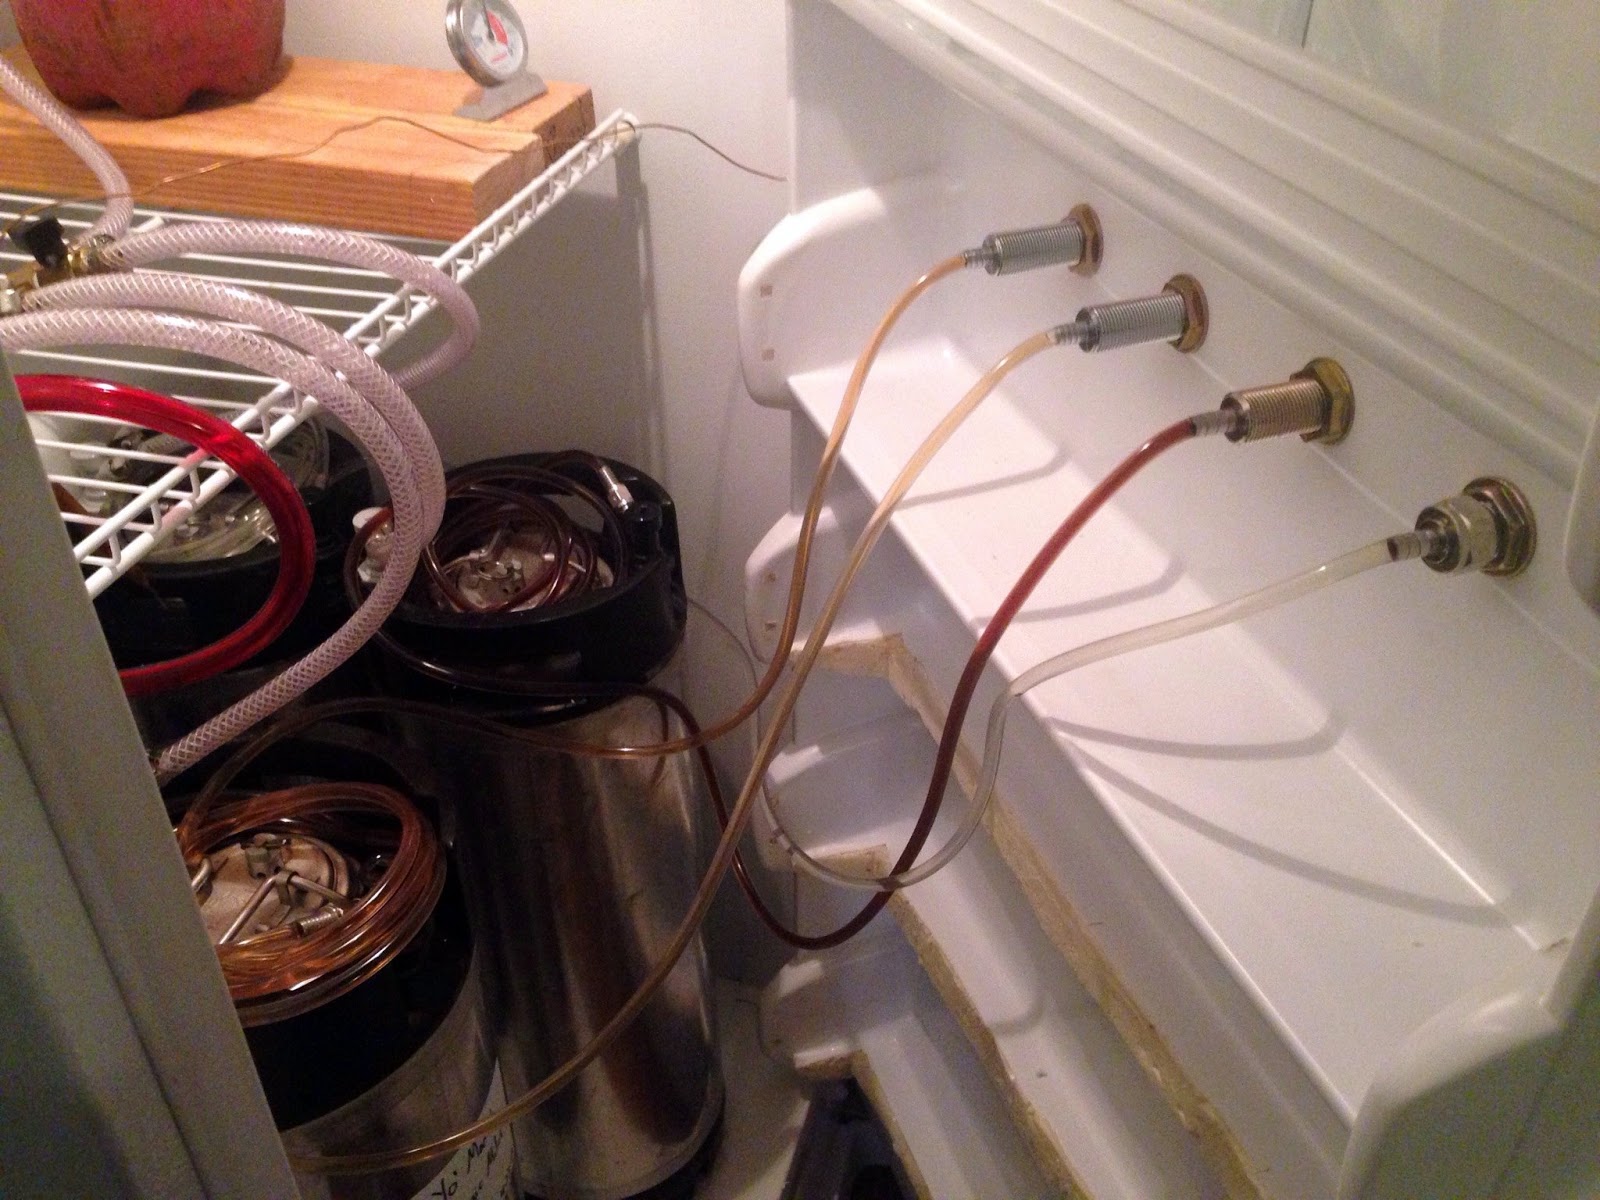
Here's a view of the inside of the door with 4 taps hooked up:


Want a kegerator, but don't want to go through the effort of building one? Then check out these links:

Sunday, September 2, 2012

How to build your own beer line cleaning system! It's inexpensive and easy!

I have a hard time with the idea of having an extra keg around just to clean my kegerator beer lines;  I knew there had to be a better way. After some research, I came across this awesome DIY beer line cleaning system at the Homebrewers Association's "Pimp My Rig" page (original link here), so I decided to build it. I have detailed the process below with pictures. This system only cost me about $21, which is a lot less than the $45-60 pre-made systems that you can purchase at your local brew store. I purchased everything at Home Depot, except for the Firestone ball-lock liquid post, which I got from my local brew store. To build this system, you will need:
  • Flo-Master 56HD Hand Pump Sprayer ($6.97)
  • Watts A-176 3/8 Flare to 3/8 FIP coupling ($2.80)
  • Teflon pipe tape ($1.18) - for a great video on how to use teflon tape, click here
  • Firestone ball-lock liquid post ($10.00). It is very important you get a Firestone post, or else the threading wont be the right size.
1) First, you need to unscrew the green nozzle on the end of the sprayer:
2) Next, you need to wrap the male threaded end of the sprayer with around 8-10 layers of teflon tape. Be sure to wrap the tape in the same direction that you'd screw something onto it! Otherwise, the tape will loosen when you screw on the next fitting.
3) Screw the coupling onto the newly taped nozzle:
4) Now, tape the end of the coupling with 8-10 layers of teflon tape as well (we want to be sure that the unit will be completely water-tight):
5) Screw on the Firestone quick disconnect:
6) Viola! You now have your beer line cleaning pump!
7) Simply fill the Flo-Master with warm water, cleaning solution, or sanitizer, and then connect the cleaning pump to your beer line:

8) Pump the Flo-Master up to pressurize the container


9) Open the tap and let the cleaning solution run through the system!

10) Repeat as necessary with other lines!

Tuesday, August 21, 2012

How to Disassemble and Clean a Corny Keg

I just got a few Cornelius Kegs for the kegerator that I am building (be on the lookout for more info!), and I found this great video on how to disassemble and clean a corny keg. Also, it has some general information on the anatomy of a quick disconnect (ball-lock) system. Enjoy!


Monday, May 14, 2012

How to effectively remove bottle labels

When I first started brewing, I was buying cases of empty 22 oz bottles to bottle my beer in. Being that they cost around $1 a piece to buy new ones, I was determined to save money and have my friends donate their empty bottles to me to use. The first obstacle I was faced with was how to remove the labels without a lot of hard work. Everywhere I looked has some method that sort of worked, but often involved a lot of scrubbing and waiting, or the use of hash chemicals. I knew there was a better way, so I set out to figure out how to do it.

The way that I've figured out involves soaking the bottles in a hot bath (~180-190 degrees F) of water with a mixture of baking soda, PBW (or bleach-free oxyclean), and borax. All of these cleaners are readily available and quite inexpensive. Using this method, I've found that about 75% of all beer labels literally fall off the bottle, and the rest are easy to peel off with tongs. As far as wine labels are concerned, about 50% of the labels fall off and the other half require a little scrubbing and scraping (It must have something to do with the adhesive type they use on some wine bottles, but I'm not quite sure).

Below, I will detail this process with photos and information. Please feel free to post any questions you may have. For this process you will need the following:
  • A large cooler with a lid (50+ quarts is best, especially if its wide and shallow)
  • PBW, bleach-free oxyclean, or an equivalent product (about 1 tablespoon for every 4 quarts of cooler size)
  • Baking Soda (about 2 tablespoons for every 4 quarts of cooler size) 
  • Borax (about 1/4 cup for every 4 quarts of cooler size) 
  • Tongs 
  • Strainer 
  • Lots of very hot water, ~180-190 degrees F 
  • A sponge with an abrasive side 
  • A separate pot or bucket of warm water for rinsing adhesive off
  • A bottle tree (this is not a necessity, but it sure makes things a LOT easier)
Alright, let's get to it:

First, heat your water. You will need enough water to nearly fill your cooler, so measure appropriately. 

High-pressure burners make this a breeze!

Next, add your measured PBW, baking soda, and borax into the cooler. Stir the solution until all of the particulates are dissolved.
It's a cleaning trifecta!

Fill the cooler about 3/4 full, add your bottles, and arrange the bottles in the cooler. I've found that its easiest to use long BBQ tongs to submerge the bottles so they fill completely. Repeat until you've cannot fill any more bottles, and then add the rest of the hot water. Then, continue to fill and place the bottles in the cooler until you cannot completely submerge any more bottles.

Close the lid, sit back and have a few beers! It takes about an hour to an hour and a half for the labels to loosen.

You'll know the labels have loosened because they will easily come off of the bottles with tongs. Some labels literally fall right off the bottles!

Peel the label off with tongs

Once you remove the label, scrub the bottle in the wash water!
Nice and clean!

Put your bottles on your bottle tree, or place them on a towel to dry.
These guys sure are handy!


Use a strainer to skim out the gross parts!
Yeah, get it!

Once you're done, you can refill the cooler with more bottles and repeat the process. Once you've finished, its time to wash em! I take them to the bath tub and fill it partway with hot water and PBW.
Time for bath #2...


Soak them in the bath for a few minutes, scrub them with a sponge, and then shake 'em a bit. This is just to make sure that you get out all of the residual paper and adhesive bits off of your bottles.


Once you've got them all on the rack, you can technically just let them dry and call it quits. However, I find that PBW leaves a residual film on the bottles, and I prefer the look of a clean and shiny bottle! So, I like to rinse them after they've dried a little bit from the PBW bath. 


Put them on the rack to dry, and you're done! Sweet :)