Friday, January 4, 2013

Snowy Summit Winter Warmer

I really enjoyed brewing (and drinking!) the Pumpkin Chai Spice Ale, so I decided to invite in the winter holidays with a similar, albeit rather different tasting, brown ale. For this beer, I used the same base English brown ale recipe, but it uses no pumpkin or pumpkin spices. Instead, I added a dash of mulling spices to the end of the boil. The resulting beer is a wonderfully aromatic and rich winter warmer, boasting 7.6% alcohol by volume and a mellow 19 IBU's. Having this stuff on tap has been fantastic, and I would highly recommend giving it a try! When using cloves in beers, I'd recommend not going overboard; they can really overpower the taste of the beer.

Snowy Summit Spiced Brown
Style: Southern English Brown Ale 
Type: All Grain
OG: 1.068
FG: 1.010
ABV: 7.60 %
IBU's: 18.67
Batch Size: 5.00 Gal
Boil Time: 60 minutes

Primary: 14 days @ 70.0°F
Secondary: 14 days @ 72.0°F
Keg: 14 days @ 40.0°F

Grains & Adjuncts
7.50 lbs Pale Malt, Maris Otter
0.25 lbs Baird's Chocolate Malt
0.25 lbs Special B Malt
0.25 lbs Biscuit Malt
0.25 lbs Special Roast

Hops
1.00 ozs Fuggles - 60 mins

Yeasts
Wyeast Labs 1056 - American Ale

Additions
1.00 tsp Irish Moss - added during the last 15 minutes of the Boil
2.00 lbs Dark Brown Sugar - added during the last 10 minutes of the boil 
1.50 tbsp Mulling Spices - added during the last 10 minutes of the Boil

Mash Profile
Sacch' Rest: 60 min @ 154.0°F
Add 12.75 qt ( 1.50 qt/lb ) water @ 174.0°F

Carbonation
12 psi Force Carbonation @ 40.0°F

Sunday, December 2, 2012

How to brew your own kombucha!

Kombucha is awesome stuff, and typically very expensive when purchased at a retail store. I used to brew a lot of kombucha a few years ago, but I had let my kombucha culture die by accident and hadn't gotten another one. Recently, a friend showed up at my door with a kombucha SCOBY (Symbiotic Culture of Bacterias & Yeast), and I decided it was time to start brewing it again! I've detailed the process below so you can brew your own kombucha too!


To make kombucha tea, you need to have access to a kombucha scoby. Either get one from a friend, from Craigslist, from online, or you can grow your own!


Kombucha tea is most often fermented using a tea base with a good deal of sugar in it. Many people like to use black teas, but I personally like kombucha that is made with green or white teas. Its important to note that you should use actual tea, not herbal teas. Although you can technically use herbal teas, I would not recommend using them by themselves. You can, however, use them in combination with regular teas, should you desire to be creative.

A kombucha scoby
For this batch of kombucha, I used a jasmine green tea with tulsi. Although I love kombucha made with jasmine green tea, be careful when using teas with fragrances, fruits, or oils in them, as they can get funky (however, they can also turn out to be totally awesome). I personally prefer using loose leaf teas, but you can use bagged teas as well.

Brew slightly less than one gallon of tea using the appropriate amount of loose leaf or bagged tea. Please note that you should steep different types of teas at different temperatures for different lengths of time, or else you risk over-steeping (this can make the tea taste too astringent and strong). Below, I have listed proper steeping temperatures and times:
  • Black Tea: >200*F (rolling boil). Steep 4-6 minutes.
  • Oolong Tea: Slightly less than boiling, around 190-200*F. Steep for 3-8 minutes (to taste)
  • Puerh Tea: Slightly less than boiling, around 190-200*F. Steep to taste (some can steep for a very long time).
  • Green Tea: 160-180*F. Steep for 2-3 minutes.
  • Loose leaf jasmine green tea
  • White Tea: 150-160*F. Steep for 2-3 minutes.
 After the tea has finished steeping, strain out the loose leaf tea or remove the tea bags. Then add one cup of white or raw sugar (i.e., turbinado sugar). I would not recommend using demerara or brown sugar as they will impart a molasses flavor (unless that is what your desire).

Add the sweet tea to your desired glass fermenter (do not, under any circumstances, use metal). The fermenter must have a large mouth so you can add and remove the scoby with ease. Allow the tea to cool to room temperature.

Once the tea is cool, add 1.5 cups of kombucha tea from a previous batch. If this is your first batch, then add either some raw kombucha tea that you've purchased from the store, or 2 Tbsp. of pasteurized white vinegar. Doing this will increase the acidity of the tea and help the scoby to thrive.
Its all ready to go!

Gently add your scoby to the tea and secure a cloth onto the fermenter using a rubber band or twine. If you decide to use cheesecloth, make sure you use many layers of cheese cloth. The idea is to allow oxygen to permeate the cloth, but not bugs.

Be sure to put the kombucha in a place where it will not be exposed to direct sunlight or excessive heat or cold (no hotter than 90*F or colder than 60*F). Allow the kombucha to ferment, undisturbed (if you move the jar around, it breaks up the baby kombucha scoby that forms on the top of the tea), for 7 days. After 7 days, begin sampling your kombucha on occasion until it reaches your desired flavor and strength. When the kombucha is young, it is still relatively sweet. The longer it ferments, the stronger and tangier it gets. Some people like their kombucha fermented for 30 days or longer.

Once your kombucha has reached your desired taste, remove the scoby and place it in a bowl or other container (again, no metal), along with 1.5 cups of your fermented tea. Place it in the refrigerator until you want to brew another batch.

The baby scoby begins to form on the surface
You can either go ahead and drink your tea as it is, or you can carbonate it! Carbonating the kombucha is easy; just naturally carbonate it in bottles, or you can keg it if you have a force carbonation setup for homebrewing. To naturally carbonate your kombucha, you will want to bottle it. Most people like to add a bit of sugar to provide fuel to the yeast and bacteria, which carbonate the tea. However, you can not add any sugar at all and the kombucha will still carbonate, but the resulting beverage will have little to no residual sweetness. If you'd like your kombucha to have some residual sweetness after carbonation, you can do it one of two ways: add either around 12 oz of juice (make sure it has no preservatives in it other than citric acid), or a little simple syrup (sugar and water) to the kombucha batch. If you are making a simple syrup, I would recommend using no more than 1 oz of sugar in the syrup. Now put the kombucha and juice/sugar mixture into sanitized beer bottles or mason jars and seal them tightly. Make sure there is a little bit of head-space in the bottles/jars.

Allow the bottles/jars to sit at room temperature for around 48 hours. DO NOT SHAKE THEM! They can explode. After the 48 hours have passed, place one in the refrigerator, get it cold, and then sample it. If it is carbonated nicely, then place all of the other jars/bottles into the refrigerator as well. If they are not carbonated to your liking, then allow them to sit at room temperature for another 24 hours and then sample again. Again, do not shake the bottles when they are room temperature, as they can explode.

After your kombucha is carbonated to your liking, then enjoy! Drink to your health and share with your friends!

Pumpkin Chai Spice Brown Ale

To me, pumpkin pie is one of the most beautiful things on this Earth. Around fall, I try to get as many pumpkin-related food items in my belly as possible. Being that I am feeling fairly competent at brewing these days, I felt that I should attempt to brew a totally awesome pumpkin ale. I have tried a a few kinds of pumpkin ale, and I have often found them to be a little lacking. I wanted to brew a pumpkin ale that would totally knock my socks off (and my friends' socks, to boot). Moreover, I didn't want to brew just any pumpkin ale; I wanted to brew a beer that would taste like you were drinking a piece of pumpkin pie.

Cleaning out the pumpkins
To increase the amount of "fall flare" in the beer, I thought it would be a nice touch to add some good loose-leaf chai tea. The tannins from black tea compliment darker beers quite nicely, and since I was planning on this being a brown ale, I thought it would be a nice addition. Furthermore, I thought the cinnamon, ginger, and cardamom of the chai tea would blend quite well with the pumpkin pie spices I was going to add to the beer.

Baking the pumpkins in trays with water
It's important to note that this beer uses real pie pumpkins, not the canned stuff! I used 7 lbs. of pie pumpkins and roasted them in the oven until they were tender. The easy way to roast pumpkins (and any other squash or gourd), is to cut them in half from top to bottom, scrape out the pulp and seeds, and then place them cut-side down in a baking tray with 1/4 inch of water in it. Bake them in the oven at 350*F for around 45-90 minutes, depending on the size of the pumpkin. You'll know they're done when you can easily insert a fork through them. Once they're cooked, remove the rind and cut the cooked pumpkin into small squares. To help expose the insides, slightly smash the cut pumpkin squares.

Cube and slightly smash after cooking
You are going to put the smashed pumpkin directly in your mash with your grains. This method imparts a bit of color as well as some flavor. In my experience, the flavor is mild and is usually present on the very back end of the palate. I also added one teaspoon of amylase to the mash to help convert some of the pumpkin starches into more sugars.

This beer turned out great! The pumpkin flavor is subtle and on the back end. The malt and hops are nice and balanced by the chai tea and spices, leaving a wonderfully pie-reminiscent flavor!


Make sure to use high-quality chai tea!
Pumpkin Chai Spice Ale:
Style: Southern English Brown Ale
Type: All Grain
OG: 1.062
FG: 1.008
ABV: 7.07 %
IBU's: 18.67
Batch Size: 5.00 Gal
Boil Time: 60 minutes

The grain bed is loaded with pumpkin!
Primary: 14 days @ 65.0°F
Secondary: 14 days @ 72.0°F
Bottle/Keg: 14 days @ 74.0°F

Grains & Adjuncts
7.50 lbs Pale Malt, Maris Otter
7.00 lbs Roasted Pie Pumpkin
0.25 lbs Baird's Chocolate Malt
0.25 lbs Special B Malt
0.25 lbs Biscuit Malt
0.25 lbs Special Roast
1.00 lbs Rice Hulls
1.00 tsp Amylase Enzyme (added to the mash)

Hops
1.00 oz Fuggles - 60 min

Yeasts
Wyeast Labs 1056 - American Ale

Additions
2.00 lbs Dark Brown Sugar - added during the last 10 minutes of the boil
0.75 tsp Pumpkin Spice - added during the last 10 minutes of the boil
2.00 oz Chai Tea - steeped for 6 minutes at flame-out
1.00 tsp Irish Moss - added during the last 15 minutes of the boil

Mash Profile
Medium Body Infusion: 60 min @ 154.0°F
 Add 23.25 qt (1.50 qt/lb) water @ 170.4°F


Carbonation
Bottle Carbonation - 4.05 oz Corn Sugar
Force Carbonation - 10.1 PSI @ 40*F

Punch-Drunk Monk Dubbel

The yummy result!
Winter is here, and its time for some hearty brews! I can't think of a better brew than a dubbel to welcome in the cold. The elements of raisin, spice, plum, and rum really make this a rich and tasty brew. It also helps that they are typically high alcohol! This was my first dubbel, and it turned out really, really well. This beer is definitely one to age for an extended period of time (like 6 months to 2 years)... if you can avoid drinking all of it beforehand! I would recommend "cold crashing" this beer, if you have the ability to do so. Cold crashing removes some unwanted flavors in the beer, helps the yest flocculate out, and helps "round" the beer out. In order to cold crash, you simply need to get your carboy down to around 35-45*F, after secondary fermentation has finished, and keep it there for 3 or 4 days. I have found that 3 or 4 days works great, but some people cold crash for a week or even a month. Then, rack and bottle or keg like normal!

Punch-Drunk Monk Dubbel
Measure those hops!
Style: Belgian Dubbel
Type: All Grain
OG: 1.065
FG: 1.014
ABV: 6.68 %
Calories: 211
IBU's: 21.70
Boil Size: 5.57 Gal
Batch Size: 5.00 Gal
Boil Time: 60 minutes

Primary: 14 days @ 68.0°F
Secondary: 21 days @ 70.0°F
Bottle/Keg: 14 days @ 72.0°F

This brew needed a blow-off tube!
Grains & Adjuncts
10.00 lbs Pale Malt (2 Row)
0.50 lbs Caramunich Malt
0.25 lbs Special B Malt
0.50 lbs Cara-Pils/Dextrine
1.00 lbs Candi Sugar, Dark - Added during the last 10 minutes of the boil

Hops
1.00 ozs Hallertauer Mittelfrueh - 60 mins
1.00 oz Hallertauer Hersbrucker - 10 mins

Chillin' in a secondary fermenter
Yeasts
Wyeast Labs 3787 - Trappist High Gravity

Additions
1.00 tsp Irish Moss - Last 15 minutes of boil

Mash Profile

Sacch' Rest - 60 min @ 151.0°F
Add 16.88 qt ( 1.50 qt/lb ) water @ 165.5°F

Carbonation
4.32 oz Corn Sugar

Friday, November 9, 2012

Super Easy Hard Cider Recipe (Apple, Cranberry, and Raspberry)

Last year, I made some hard cider that was delicious and gave you a kick in the pants with its 8.5% alcohol by volume. It was also very, very expensive to brew. Getting freshly pressed, organic, unpasteurized cider can be quite costly (unless you have a fruit press). Due to the cost of graduate school, I don't quite have the funds to make fancy hard cider this year, so I decided to brew some with store-bought juice.

I went to Costco and bought 4 gallons of 100% fresh pressed, albeit pasteurized, apple juice. I also bought 1.5 gallons of cranberry raspberry juice blend (again, 100% juice). It is important to note that neither of these juices had any sodium-based preservatives in them, and if you're planning on making your own cider, make sure you also get juice without preservatives. Your yeast may not propagate if the juice has preservatives in it.
 Although I could have used only apple juice, I thought that the tart and sweet flavor of the cranberry raspberry juice would give the cider a nice flavor profile. Feel free to experiment, however! Think of the apple juice as the canvas and the other juice(s) as the paints.

In the secondary fermenter
For this recipe, you will need the following:
  • 6-6.5 gallon sanitized fermenting bucket or carboy for primary fermentation
  • 5 gallon sanitized carboy for secondary fermentation
  • 5-5.5 gallons of juice
  • 3-5 lbs. of white table sugar (your resulting beverage will be 7-12 % alcohol, depending on how much sugar you use). If you'd like a very low alcohol cider, you can just not add any sugar at all; your resulting beverage should be around 3-4% alcohol.
  • Wyeast 4766, Cider Yeast
  • Sanitized racking equipment
  • Yeast nutrient, if adding more than 3 lbs. of sugar (add 1 tsp per gallon of juice).
 Here is the process:
  • Heat one gallon of juice until it is warm enough to dissolve the sugar in it. Do not boil the juice.
  • Stir in your desired amount of sugar until it is completely dissolved.
  • Mix the sugar/juice mixture and yeast nutrient (if needed) into your sanitized primary fermenter with the rest of the juice.
  • Allow the mixture to reach room temperature and then pitch your yeast.
  • Place the cider out of direct sunlight in an area that is between 60*F and 70*F. Allow to ferment for 2 weeks.
  • Siphon the cider into the secondary fermenter (do not use your mouth to siphon, as you will probably contaminate the cider with bacteria). Allow to ferment in the same area for another 2 weeks.
  • Bottle or keg the cider. Drink and be merry!

How I built my kegerator out of a 25 cu. ft. upright freezer (aka keezer)

I have wanted a kegerator for years, long before I began brewing beer. After I had gotten a solid feel for brewing, I decided it was time to get a force-carbonation setup and build a kegerator. At first, I began looking for mini-fridges, but I really wanted to build a setup that could take 4 Cornelius kegs (5-gallon) and a CO2 tank. I could not find a decently priced, used mini-fridge that could fit all of it. I happened across a 25 cu. ft. commercial freezer on Craigslist for a great price, so I bought it. With this size, I will be able to fit up to 7 kegs and a 10 lb. CO2 tank. The initial setup is quite costly, so I only installed one tap to start, but I have a 4-way gas manifold which allowed me to expand to 4 taps over time.


First, I cut out the three bottom shelves in the door to allow more room for the kegs. I used a cordless electric handsaw to cut out the shelves, and then I used some plant-based spray-on foam insulation (picked up at my local hardware store) to fill the gaping holes that remained. After that, I cut off the excess foam insulation and then sanded it down.


I retained the top few shelves for storing glasses. I went to Goodwill and picked up both pint and liter glasses. It's good to have options!


I bought a Perlick 525 Stainless Steel faucet, which I am super satisfied with. These faucets are forward-sealing, so they are easier to clean and less likely to harbor bacteria. I purchased these shanks from MoreBeer.com, and they were the perfect size for the freezer door.


Installing the faucet was rather easy: I simply used a 1" hole saw to bore a hole through the freezer door, then I slid the shank in and tightened it down and installed the tap.


I bought an Eva-Dry e500 dehumidifier for the freezer, which has proven to be a great investment. I'd highly recommend getting one, should you decide to build a kegerator. It has a 10 year life span and you can recharge it by simply plugging it into a wall outlet for an hour. You can see it positioned behind my 4-way CO2 manifold in the picture to the right.


To keep the freezer's temperature sitting at 40*F (which I have found to be the sweet spot for kegged beer), I installed a Johnson Controls analog temperature controller. This controller is great because it is accurate and it does not require any electrical rewiring.


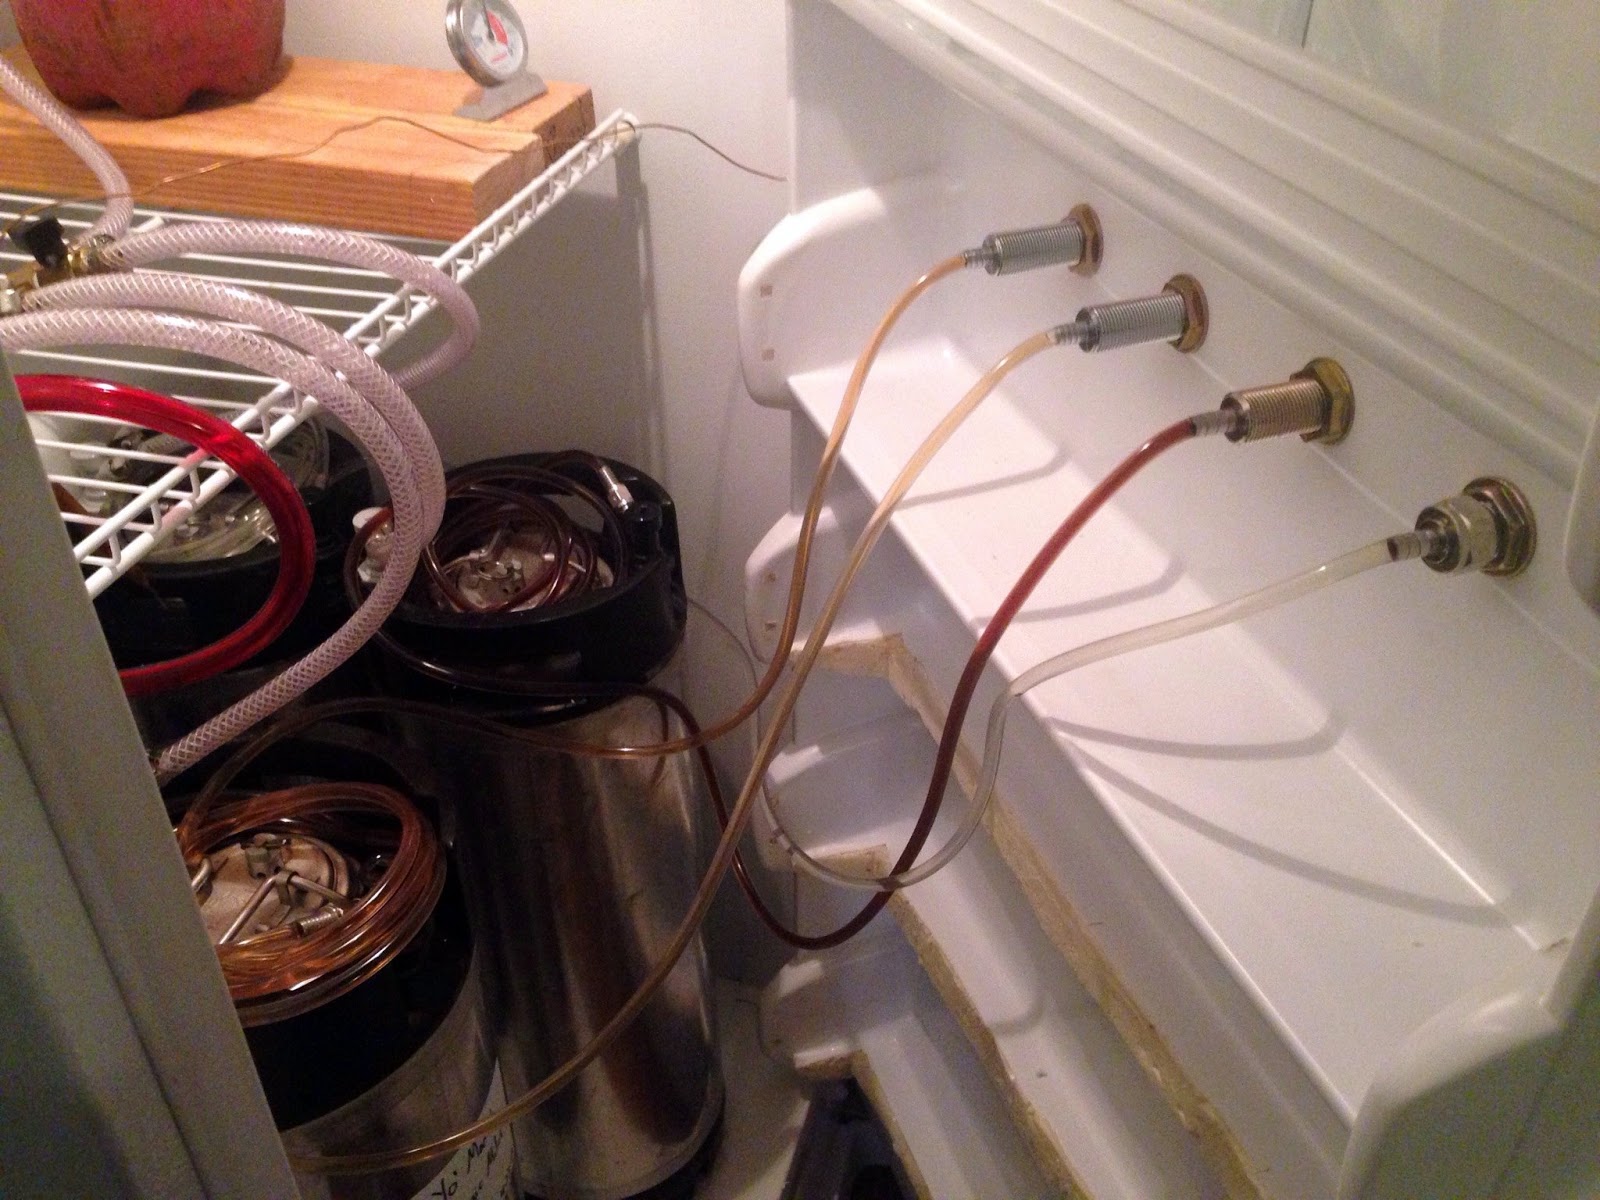
Here you can see the whole setup. I've got the CO2 tank connected to a dual-gauge CO2 regulator, which feeds into the 4-way gas manifold, which then charges the kegs. The keg on the right is connected to the faucet, and you can see how I have all of the beer line coiled around the top of the keg. Even after "balancing" my system, I was initially having foaming problems. After asking around on some forums, I was advised to use 10 feet of beer line instead of the 5 feet I was using. I simply coil all of the slack around the top of the keg, and now I have no more foaming problems!


Here's a view of the inside of the door with 4 taps hooked up:


Want a kegerator, but don't want to go through the effort of building one? Then check out these links:

Monday, November 5, 2012

A quote to brew by...

Wiser words are seldom spoken:
"In life, patience is a virtue; in brewing, it is a requirement." - haerbob3 from the Mr. Beer forums.