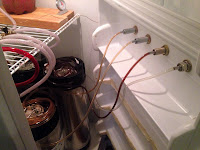
First, I cut out the three bottom shelves in the door to allow more room for the kegs. I used a cordless electric handsaw to cut out the shelves, and then I used some plant-based spray-on foam insulation (picked up at my local hardware store) to fill the gaping holes that remained. After that, I cut off the excess foam insulation and then sanded it down.
I retained the top few shelves for storing glasses. I went to Goodwill and picked up both pint and liter glasses. It's good to have options!

I bought a Perlick 525 Stainless Steel faucet, which I am super satisfied with. These faucets are forward-sealing, so they are easier to clean and less likely to harbor bacteria. I purchased these shanks from MoreBeer.com, and they were the perfect size for the freezer door.

Installing the faucet was rather easy: I simply used a 1" hole saw to bore a hole through the freezer door, then I slid the shank in and tightened it down and installed the tap.

I bought an Eva-Dry e500 dehumidifier for the freezer, which has proven to be a great investment. I'd highly recommend getting one, should you decide to build a kegerator. It has a 10 year life span and you can recharge it by simply plugging it into a wall outlet for an hour. You can see it positioned behind my 4-way CO2 manifold in the picture to the right.

To keep the freezer's temperature sitting at 40*F (which I have found to be the sweet spot for kegged beer), I installed a Johnson Controls analog temperature controller. This controller is great because it is accurate and it does not require any electrical rewiring.

Here you can see the whole setup. I've got the CO2 tank connected to a dual-gauge CO2 regulator, which feeds into the 4-way gas manifold, which then charges the kegs. The keg on the right is connected to the faucet, and you can see how I have all of the beer line coiled around the top of the keg. Even after "balancing" my system, I was initially having foaming problems. After asking around on some forums, I was advised to use 10 feet of beer line instead of the 5 feet I was using. I simply coil all of the slack around the top of the keg, and now I have no more foaming problems!

Here's a view of the inside of the door with 4 taps hooked up:
Want a kegerator, but don't want to go through the effort of building one? Then check out these links:

No comments:
Post a Comment
If you would like to post a comment, please keep it pertinent to the topic and suitable for all ages. Thanks!